Deploying the Altair 8800 Emulator with Docker
This guide explains how to start and configure the Altair 8800 emulator using Docker. The Altair emulator is a software recreation of the classic Altair 8800 computer, supporting CP/M and other retro environments. You can run it on Linux, macOS, Windows, and Raspberry Pi.
Below you'll find instructions for standard and advanced deployment modes, environment variable configuration, persistent disk storage, and useful Docker commands.
Altair 8800 Standard Mode
This option is recommended for most users and works on 32-bit and 64-bit (recommended) versions of Linux, macOS, Windows, and Raspberry Pi.
docker run -d --user root -p 8082:8082 -p 8088:8080 --name altair8800 --rm glovebox/altair8800:latest
Ports
- Port 8088 provides access to the Web Terminal interface
- Port 8082 enables Altair emulator terminal I/O through a WebSocket connection.
Altair 8800 Advanced Modes
You can enable advanced features by setting environment variables. These options can be combined as needed:
- Set the time zone.
- Connect to an MQTT broker to publish Altair address and data bus information.
- Integrate with OpenAI Chat Completions
- Connect to the Open Weather Map service for current weather data.
- Run on a Raspberry Pi with a Pi Sense HAT to display address and data bus info on the 8x8 LED panel.
Docker Environment Variables
The Altair emulator supports several Docker environment variables. The easiest way to set these is with the env file --env-file option. You'll find a sample altair.env file in the root folder of this project. Create a copy of this file, modify it as needed and save it somewhere convenient and safe especially if it contains sensitive information like API keys.
Store your modified altair.env file in a secure location, especially if it contains sensitive information such as API keys. Open the altair.env file in a text editor and set the environment variables you want to use. Then, start the Altair emulator Docker container with the --env-file option.
Supported Environment Variables
| Variable | Description |
|---|---|
| TZ | Set the time zone (e.g., Australia/Sydney) |
| MQTT_HOST | MQTT broker host |
| MQTT_PORT | MQTT broker port (default: 1883) |
| MQTT_CLIENT_ID | Unique MQTT client ID |
| OPENAI_API_KEY | OpenAI API Key |
| OPENAI_ENDPOINT | OpenAI Endpoint (default: https://api.openai.com/v1/chat/completions) |
| OPEN_WEATHER_MAP_API_KEY | API key for Open Weather Map |
| FRONT_PANEL | Front panel type (sensehat, kit, none; default: none) |
| SLOW_CPU_ON_DISCONNECT | Slow CPU on Browser Disconnect. Defaults to true and power saving mode. |
docker run -d --env-file altair.env --user root -p 8082:8082 -p 8088:8080 --name altair8800 --rm glovebox/altair8800:latest
Time Zone
Set the time zone with the TZ=YOUR_TIME_ZONE environment variable. For example, to set the time zone to Sydney, Australia, use TZ=Australia/Sydney. See the list of time zones for your location.
MQTT Broker
Connect to an MQTT broker to publish Altair address and data bus information. Set the following environment variables:
- MQTT_HOST=
YOUR_MQTT_HOST - MQTT_PORT=
YOUR_MQTT_PORT(default: 1883) - MQTT_CLIENT_ID=
YOUR_MQTT_CLIENT_ID(must be unique for each client)
ThingsBoard
Telemetry data is sent to the MQTT topic v1/devices/me/telemetry in ThingsBoard format.
You can install the free ThingsBoard Community Edition locally, including on devices like a Raspberry Pi. See the ThingsBoard installation guide.
In ThingsBoard, create an MQTT device to represent your Altair emulator. Use the same MQTT_CLIENT_ID when connecting from the Altair emulator.
Open Weather Map
Connect to the Open Weather Map service for current weather information. Set:
- OPEN_WEATHER_MAP_API_KEY=
YOUR_OPEN_WEATHER_MAP_API_KEY(get a free API key at Open Weather Map)
OpenAI Chat Key
Configure your OpenAI API Key
- OPENAI_API_KEY
OpenAI Endpoint
- The default endpoint is https://api.openai.com/v1/chat/completions.
- For LM Studio, use http://IP_ADDRESS:1234/v1/chat/completions. If Altair runs in a container, use the LM Studio server's IP address—not localhost—since localhost refers to the container itself.
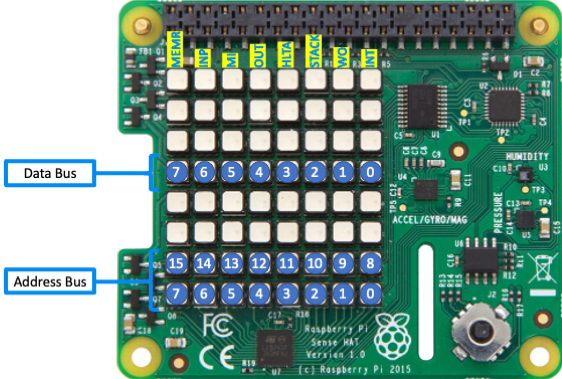
Raspberry Pi with Pi Sense HAT
You can run the Altair emulator on a Raspberry Pi with a Pi Sense HAT attached. The Pi Sense HAT 8x8 LED panel displays the Altair address and data bus information. For games, you can switch between Font and bitmap display modes.
You can switch between Font and bitmap display modes using the emulator's front panel controls or configuration options. Refer to the emulator documentation for specific instructions on changing display modes.
| Raspberry Pi with Pi Sense HAT | Raspberry Pi Sense HAT |
|---|---|
 |
 |
Enable the Pi Sense HAT
Set the front panel environment variable:
- FRONT_PANEL=
sensehat(Options: sensehat, kit, none; default: none)
Enable I2C Hardware Access
Enable I2C hardware access and pass the --device option to the docker run command:
-
Enable I2C hardware access on the Raspberry Pi:
sudo raspi-config nonint do_i2c 0 -
Pass the
--deviceoption to thedocker runcommand:docker run -d --env-file ~/altair.env --privileged --device=/dev/i2c-1 --user root -p 8082:8082 -p 8088:8080 --name altair8800 --restart always glovebox/altair8800:latest
Altair Disk Storage
Altair emulator disks can be stored in a Docker persistent storage volume. This ensures any changes made to the contents of the Altair disks are saved if the Docker container is stopped or deleted.
docker run -d --env-file ~/altair.env --privileged --device=/dev/i2c-1 -v altair-disks:/app/Disks --user root -p 8082:8082 -p 8088:8080 --name altair8800 --restart always glovebox/altair8800:latest
Or, pass environment variables using the environment file:
docker run -d -v altair-disks:/app/Disks --env-file altair.env --user root -p 8082:8082 -p 8088:8080 --name altair8800 --rm glovebox/altair8800:latest
Open the Web Terminal
To access the Altair emulator, open the Web Terminal:
- Familiarize yourself with the Web Terminal and the CP/M operating system.
-
Open your web browser:
- If running locally, go to
http://localhost:8088. - If running remotely, go to
http://<hostname_or_ip_address>:8088.

- If running locally, go to
Connecting to a Remote Altair Emulator
To connect your local Web Terminal to a remote Altair emulator, add the altair query parameter to the URL. For example, if the remote Altair emulator is running at 192.168.1.100, open your browser and go to http://localhost?altair=192.168.1.100. This requires the Web Terminal to be running on your local machine, either in a separate Docker container or installed locally.
Note: The Web Terminal must be running locally (either in a separate Docker container or installed on your machine) to connect to a remote Altair emulator using the altair query parameter.
Docker Tips and Tricks
Manage the Altair Emulator Docker Container
Stop the container:
Stops the running Altair emulator container:
docker stop altair8800
Restart the container:
Restarts a previously stopped Altair emulator container:
docker start altair8800
Delete the container:
Removes the Altair emulator container after stopping it:
docker rm altair8800
Manage Persistent Storage Volume
Inspect the volume:
docker volume inspect altair-disks
Check data in the volume:
sudo ls -al /var/lib/docker/volumes/altair-disks/_data
Remove the volume:
docker volume rm altair-disks