Create-a-talking-image-recognition-solution-with-Azure-IoT-Edge-Azure-Cognitive-Services
This project is maintained by gloveboxes
Module 3: Set up your development environment
Index
- Module 1: Create an Azure IoT Hub
- Module 2: Install Azure IoT Edge on your Raspberry Pi
- Module 3: Set up your development environment
- Module 4: Create Azure Cognitive Services
- Module 5: Build and deploy the solution
-
Module 6: Build and deploy the solution
- Home
Set up SSH Authentication between your computer and Raspberry Pi

Setting up a public/private key pair for SSH authentication is a secure and fast way to authenticate from your computer to the Raspberry Pi. Visual Studio Code Remote SSH Development will be using SSH authentication.
The Raspberry Pi SSH Authentication utility will prompt you for:
- The Raspberry Pi Network IP Address. Run
hostname -I | cut -d" " -f 1on your Raspberry Pi to display its IP address. - The Raspberry Pi login name and password. The Raspberry Pi default login name is pi, and the default password is raspberry.
Set up SSH for Windows Users
The SSH utility guides you through the process of setting up a secure SSH channel for Visual Studio Code and the Raspberry Pi.
- Start Powershell From the Start Menu. Click Start, type PowerShell, and then click Windows PowerShell.
-
Download the Raspberry Pi SSH Authentication Utility.
Run the following PowerShell command.
Invoke-WebRequest -Uri "https://raw.githubusercontent.com/gloveboxes/Setting-up-Raspberry-Pi-SSH-Authentication/master/windows-ssh-setup.cmd" -OutFile "windows-ssh-setup.cmd" -
Start the Raspberry Pi SSH Authentication Utility.
Run the following PowerShell command.
.\windows-ssh-setup.cmd
Set up SSH for Linux and macOS Users
The SSH utility guides you through the process of setting up a secure SSH channel for Visual Studio Code and the Raspberry Pi.
- Open a Terminal window
-
Copy and paste the following command, and press ENTER
curl https://raw.githubusercontent.com/gloveboxes/Setting-up-Raspberry-Pi-SSH-Authentication/master/ssh-setup.sh | bash
Install Visual Studio Code on your computer
Visual Studio Code is a code editor and is one of the most popular Open Source projects on GitHub. It runs on Linux, macOS, and Windows.
- Install Visual Studio Code from here.
Start a VS Code and start a Remote SSH Session
- Start Visual Studio Code
-
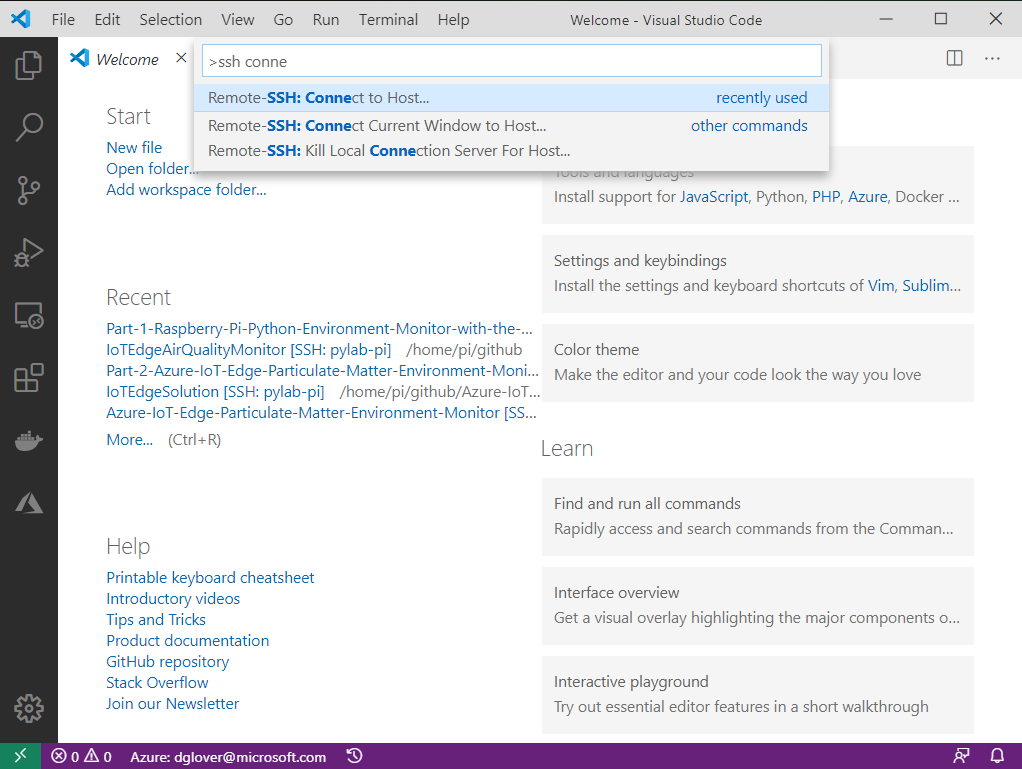
Press F1 to open the Command Palette, type ssh connect and select Remote-SSH: Connect to Host

-
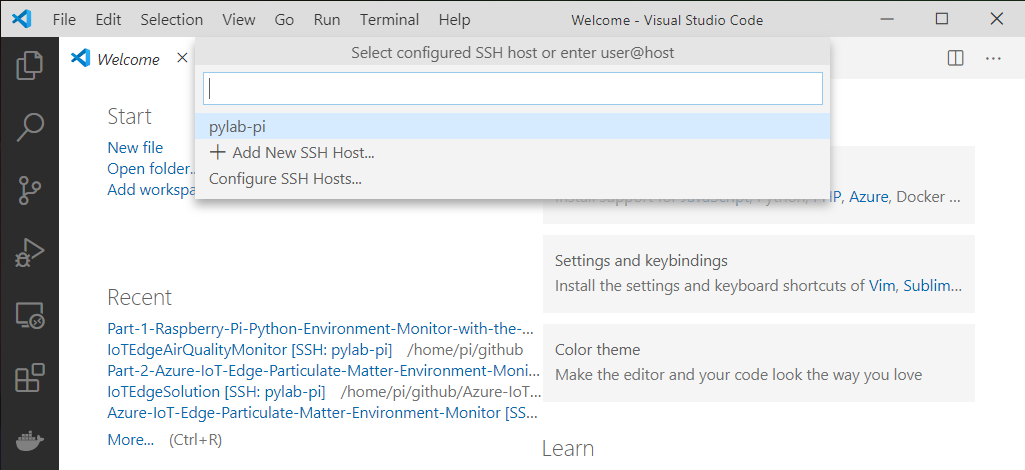
Select the pylab-pi configuration

-
A new instance of VS Code starts and connected to your Raspberry Pi.
It will take a moment to connect, then the SSH Status in the bottom lefthand corner of Visual Studio Code will change to >< SSH:pylab-pi.

Install VS Code Extensions
The following Visual Studio Code Extensions are required.
Python extension for Visual Studio Code Docker for Visual Studio Code Azure Account Azure IoT Tools
To install the required Visual Studio Code Extensions, follow these instructions:
- From Visual Studio Code menu, click View, then Extensions.
- Type Python extension for Visual Studio Code.
- Click Install in SSH: pylab-pi.
- Repeat this process for the remaining required extensions. Be sure to Install in SSH: pylab-pi.
- Docker for Visual Studio Code
- Azure Account
- Azure IoT Tools
- You will be prompted to Reload. Click on Reload Required.
Open the Azure IoT Edge solution on the Raspberry Pi
Now that you have start the Visual Studio Code Remote SSH Development you need to open the Create-a-talking-image-recognition-solution-with-Azure-IoT-Edge-Azure-Cognitive-Services you cloned to the Raspberry Pi.
-
From the Visual Studio Code menu, click File, then Open Folder.
This will open the file system on the Raspberry Pi.
-
Select the Create-a-talking-image-recognition-solution-with-Azure-IoT-Edge-Azure-Cognitive-Services directory.

-
Click OK.