Building a Serverless IoT Solution with Python Azure Functions and SignalR
Follow me on Twitter, Project Source Code, Powerpoint Slides, PDF Slides
Solution Overview

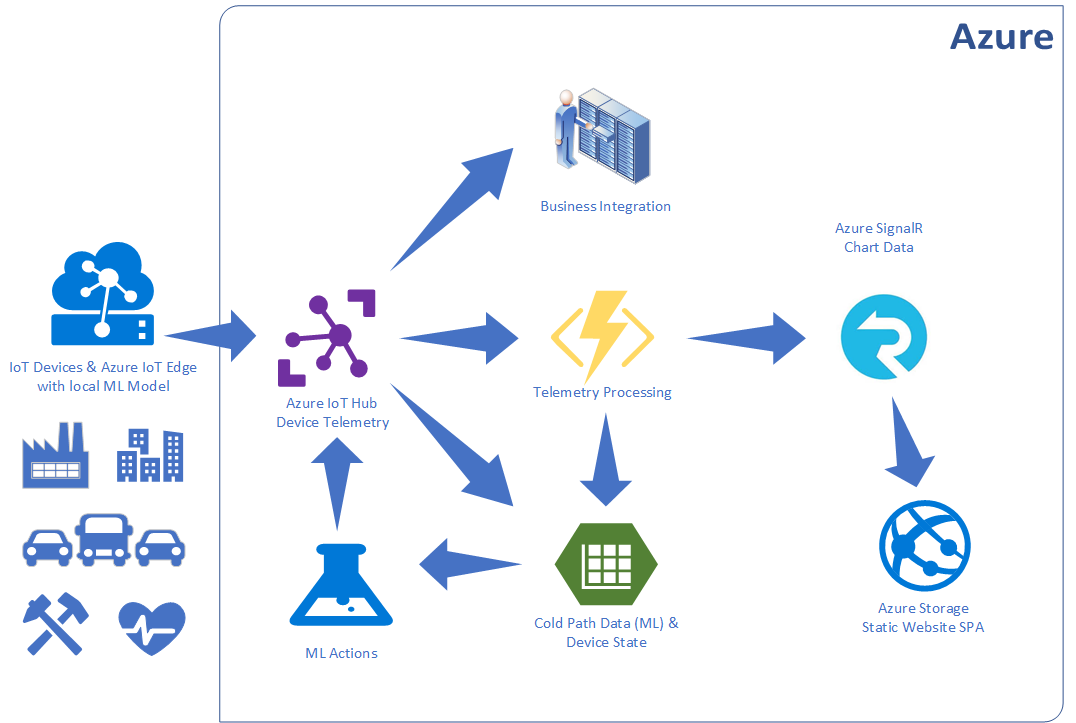
This solution diagram overviews a typical IoT solution. Azure IoT Hub is responsible for internet scale, secure, bi-directional communication with devices and backend services.
Telemetry can be routed by Azure IoT Hub to various services and also to storage in Apache Avro or JSON format for purposes such as audit, integration or driving machine learning processes.
This posting takes a slice of this scenario and is about the straight through serverless processing of telemetry from Azure IoT Hub, via Python Azure Functions and Azure SignalR for a near real-time dashboard.
Azure Services
The following Azure services are used in this solution and available in Free tiers: Azure IoT Hub, Azure Functions, Azure SignalR, Azure Storage, Azure Storage Static Websites
You can sign up for a Free Azure Account, if you are a student then be sure to sign up for Azure for Students, no credit card required.
Developing Python Azure Functions
Where to Start
Review the Azure Functions Python Worker Guide. There is information on the following topics:
- Create your first Python function
- Developer guide
- Binding API reference
- Develop using VS Code
- Create a Python Function on Linux using a custom docker image
Solution Components (included in this GitHub repo)
-
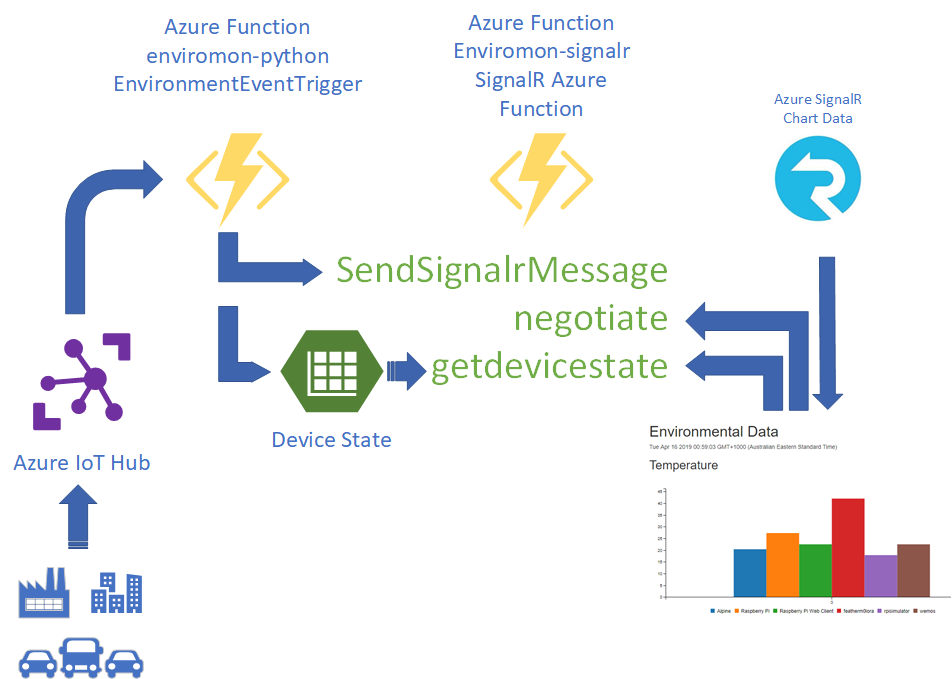
Python Azure Function. This Azure Function processes batches of telemetry, then calibrations and validates telemetry, and updates the Device State Azure Storage Table, and then passes the telemetry to the Azure SignalR service for near real-time web client update.
-
Azure SignalR .NET Core Azure Function (Written in C# until a Python SignalR binding available). This Azure Function is responsible for passing the telemetry to the SignalR service to send to SignalR Web client dashboard.
-
Web Dashboard. This Single Page Web App is hosted on Azure Storage as a Static Website. So it too is serverless.
Design Considerations
Optimistic Concurrency
First up, it is useful to understand Event Hub Trigger Scaling and how additional function instances can be started to process events.
I wanted to maintain a count in the Device State table of the number of times a device had sent telemetry. The solution implements Azure Storage/CosmosDB Optimistic Concurrency.
Optimistic Concurrency (OCC) assumes that multiple transactions can frequently complete without interfering with each other. While running, transactions use data resources without acquiring locks on those resources. Before committing, each transaction verifies that no other transaction has modified the data it has read. OCC is generally used in environments with low data contention.
If there are multiple functions instances updating and there is a clash, I have implemented Exponential Backoff and added a random factor to allow for retry.
Pseudo code: random(occBase, min(occCap, occBase * 2 ^ attempt))
def calcExponentialFallback(attempt):
    base = occBase * pow(2, attempt)
    return random.randint(occBase, min(occCap, base)) / 1000.0
From my limited testing Exponential Backoff was effective.
Telemetry Processing
The ‘updateDeviceState’ first checks to see if the entity is already in the storage table. If the entity exists the ‘etag’ is used by the call to merge_entity. The call to merge_entity succeeds if the etag matches the etag of the entity in storage at merge time.
def updateDeviceState(telemetry):
    mergeRetry = 0

    while mergeRetry < 10:
        mergeRetry += 1

        try:
            # get existing telemetry entity
            entity = table_service.get_entity(
                deviceStateTable, partitionKey, telemetry.get('deviceId', telemetry.get('DeviceId')))
            etag = entity.get('etag')
            count = entity.get('Count', 0)
        except:
            entity = {}
            etag = None
            count = 0

        count += 1

        updateEntity(telemetry, entity, count)
        calibrator.calibrateTelemetry(entity)

        if not validateTelemetry(entity):
            break

        try:
            if etag is not None:    # if etag found then record existed
                # try a merge - it will fail if etag doesn't match
                table_service.merge_entity(
                    deviceStateTable, entity, if_match=etag)
            else:
                table_service.insert_entity(deviceStateTable, entity)

            return entity

        except:
            interval = calcExponentialFallback(mergeRetry)
            logging.info("Optimistic Consistency Backoff interval {0}".format(interval))
            time.sleep(interval)

    else:
        logging.info('Failed to commit update for device {0}'.format(
            entity.get('DeviceId')))
Telemetry Calibration Optimization
You can either calibrate data on the device or in the cloud. I prefer to calibrate cloud-side. The calibration data could be loaded with Azure Function Data Binding but I prefer to lazy load the calibration data. There could be a lot of calibration data so it does not make sense to load it all at once when the function is triggered.
def getCalibrationData(deviceId):
    if deviceId not in calibrationDictionary:
        try:
            calibrationDictionary[deviceId] = table_service.get_entity(
                calibrationTable, partitionKey, deviceId)
        except:
            calibrationDictionary[deviceId] = None

    return calibrationDictionary[deviceId]
Telemetry Validation
IoT solutions should validate telemetry to ensure data is within sensible ranges to allow for faulty sensors.
def validateTelemetry(telemetry):
    temperature = telemetry.get('Celsius')
    pressure = telemetry.get('hPa')
    humidity = telemetry.get('Humidity')

    if temperature is not None and not -40 <= temperature <= 80:
        return False
    if pressure is not None and not 600 <= pressure <= 1600:
        return False
    if humidity is not None and not 0 <= humidity <= 100:
        return False
    return True
Azure SignalR Integration
There is no Service-Side Azure SignalR SDK. To send telemetry from the Event Hub Trigger Azure Function to the Dashboard Web Client you need to call a HTTP Azure Function that is bound to the SignalR service. This SignalR Azure Function then sends the telemetry via SignalR as if the data was coming from a client-side app.
The flow for Azure SignalR integration is as follows:
- The Web client makes a REST call to ‘negotiate’, amongst other things, the SignalR ‘Hubname’ is returned to the client.
- The Web client then makes a REST call to ‘getdevicestate’, this HTTP Trigger retrieves the state for all devices from the Device State Table. The data is returned to the client via SignalR via the same ‘Hubname’ that was returned from the call to ‘negotiate’.
- When new telemetry arrives via IoT Hub, the ‘EnvironmentEventTrigger’ trigger fires, the telemetry is updated in the Device State table and a REST call is made to the ‘SendSignalRMessage’ and telemetry is sent to all the SignalR clients listening on the ‘Hubname’ channel.

Set Up Overview
This lab uses free of charge services on Azure. The following need to be set up:
- Azure IoT Hub and Azure IoT Device
- Azure SignalR Service
- Deploy the Python Azure Function
- Deploy the SignalR .NET Core Azure Function
Step 1: Follow the Raspberry Pi Simulator Guide to set up Azure IoT Hub
While in Python Azure Functions are in preview they are available in limited locations. For now, ‘westus’, and ‘westeurope’. I recommend you create all the project resources in one of these locations.
Setting up the Raspberry Pi Simulator

Step 2: Create an Azure Resource Group
az group create -l westus -n enviromon-python
Step 3: Create a Azure Signal Service
- az signalr create creates the Azure SignalR Service
- az signalr key list returns the connection string you need for the SignalR .NET Core Azure Function.
az signalr create -n <Your SignalR Name> -g enviromon-python --sku Free_DS2 --unit-count 1
az signalr key list -n <Your SignalR Name> -g enviromon-python
Step 4: Create a Storage Account
az storage account create -n enviromonstorage -g enviromon-python -l westus --sku Standard_LRS --kind StorageV2
Step 5: Clone the project
git clone https://github.com/gloveboxes/Go-Serverless-with-Python-Azure-Functions-and-SignalR.git
Step 6: Deploy the SignalR .NET Core Azure Function
cd  Go-Serverless-with-Python-Azure-Functions-and-SignalR

cd dotnet-signalr-functions

cp local.settings.sample.json local.settings.json

code .
Step 7: Update the local.settings.json
{
    "IsEncrypted": false,
    "Values": {
        "AzureWebJobsStorage": "<The Storage Connection String for enviromonstorage>",
        "FUNCTIONS_WORKER_RUNTIME": "dotnet",
        "StorageConnectionString":"<The Storage Connection String for enviromonstorage>",
        "AzureSignalRConnectionString": "<The SignalR Coonection String from Step 3>"
    },
    "Host": {
        "LocalHttpPort": 7071,
        "CORS": "http://127.0.0.1:5500,http://localhost:5500,https://azure-samples.github.io",
        "CORSCredentials": true
    }
}
Step 8: Deploy the SignalR .NET Core Azure Function
- Open a terminal window in Visual Studio. From the main menu, select View -> Terminal
- Deploy the Azure Function
func azure functionapp publish --publish-local-settings <Your SignalR Function Name>
func azure functionapp list-functions <Your SignalR Function Name>
Functions in mysignal-signalr:
    getdevicestate - [httpTrigger]
        Invoke url: https://mysignal-signalr.azurewebsites.net/api/getdevicestate

    negotiate - [httpTrigger]
        Invoke url: https://mysignal-signalr.azurewebsites.net/api/negotiate

    SendSignalrMessage - [httpTrigger]
        Invoke url: https://mysignal-signalr.azurewebsites.net/api/sendsignalrmessage?code=DpfBdeb9TV1FCXXXXXXXXXXXXX9Mo8P8FPGLia7LbAtZ5VMArieo20Q==
** You need copy and paste the SendSignalrMessage Invoke url somewhere handy.
Step 9: Open the Python Functions Project with Visual Studio Code
Change to the directory where you cloned to the project to, the change to the iothub-python-functions directory, then start Visual Studio Code.
From Terminal on Linux and macOS, or Powershell on Windows.
cd  Go-Serverless-with-Python-Azure-Functions-and-SignalR

cd iothub-python-functions

cp local.settings.sample.json local.settings.json

code .
Step 10: Update the local.settings.json
{
  "IsEncrypted": false,
  "Values": {
    "FUNCTIONS_WORKER_RUNTIME": "python",
    "AzureWebJobsStorage": "<The Storage Connection String for enviromonstorage>",
    "IoTHubConnectionString": "<The IoT Hub Connection String>",
    "PartitionKey": "<Storage Partition Key - arbitrary - for example the name of city/town>",
    "StorageConnectionString": "<The Storage Connection String for enviromonstorage>",
    "SignalrUrl": "<SendSignalrMessage Invoke URL>"
  }
}
Step 11: Deploy the Python Azure Function
- Open a terminal window in Visual Studio. From the main menu, select View -> Terminal
- Deploy the Azure Function
func azure functionapp publish enviromon-python --publish-local-settings --build-native-deps
Step 12: Enable Static Websites for Azure Storage
The Dashboard project contains the Static Website project.
Follow the guide for Static website hosting in Azure Storage.
The page used for this sample is enviromon.html. Be sure to modify the “apiBaseUrl” url in the web page javascript to point your instance of the SignalR Azure Function.
Copy the contents of the dashboard project to the static website.
Step 13: Enable CORS for the SignalR .NET Core Azure Function
az functionapp cors add -g enviromon-python -n <Your SignalR Function Name> --allowed-origins <https://my-static-website-url>
Step 14: Start the Dashboard
From your web browser, navigate to https://your-start-web-site/enviromon.html
The telemetry from the Raspberry Pi Simulator will be displayed on the dashboard.
