Windows with an NVidia GPU
The recommended configuration for running the OpenAI Whisper sample on Windows is with WSL 2 and an NVidia GPU. This configuration is popular and provides the best performance. The OpenAI Whisper speech to text transcription runs consistently faster on WSL 2 than natively on Windows.
Ideally, your system should have:
Windows 11 with WSL 2 and Ubuntu 20.04 LTS.
Ubuntu 20.04 includes Python 3.8.
As At June 2023, the OpenAI Whisper library is compatible with Python 3.8-3.10
A modern CPU with 16 GB of RAM.
An NVidia GPU with 10 to 12 GB of VRAM. But you can run smaller Whisper models on GPUs with less VRAM.
Update the NVidia drivers
Ensure the NVidia drivers are up to date. The NVidia drivers are installed in Windows. WSL includes a GPU driver that allows WSL to access the GPU, so don't install the NVidia drivers in WSL.
Install WSL 2
- Follow the instructions to install WSL.
- This sample was tested with Ubuntu 20.04 LTS running in WSL 2. You can download Ubuntu 20.04 LTS from the Microsoft Store.
Install Ubuntu dependencies
- Update the Ubuntu system.
- From a WSL terminal.
- Run:
sudo apt update && sudo apt upgrade - Restart WSL if necessary, from PowerShell, run
wsl --shutdown.
- Install the dependencies.
- Run:
sudo apt install ffmpeg python3-pip python3-venv - Test FFmpeg. Run
ffmpeg -version. The command should return the FFmpeg version.
- Run:
Start the Whisper Transcriber Service
From a WSL terminal.
Clone the Whisper Transcriber Sample to your preferred repo folder.
git clone https://github.com/gloveboxes/OpenAI-Whisper-Transcriber-Sample.gitNavigate to the
serverfolder.cd OpenAI-Whisper-Transcriber-Sample/serverCreate a Python virtual environment.
dangerAt the time of writing (June 2023), the Whisper Python library is supported on Python 3.8 to 3.10. The Whisper library worked on Python 3.11.3, but not Python 3.11.4. Be sure to check the version of Python you are using
python3 --version.python3 -m venv .whisper-venvActivate the Python virtual environment.
source .whisper-venv/bin/activateInstall the required Python libraries.
pip3 install -r requirements.txtTest that CUDA/GPU is available to PyTorch.
Run the following command, if CUDA is available, the command will return
True.python3 -c "import torch; print(torch.cuda.is_available())"Review the following chart is taken from the OpenAI Whisper Project Description page and select the model that will fit in the VRAM of your GPU. At the time of writing, Whisper multilingual models include
tiny,small,medium, andlarge, and English-only models includetiny.en,small.en, andmedium.en.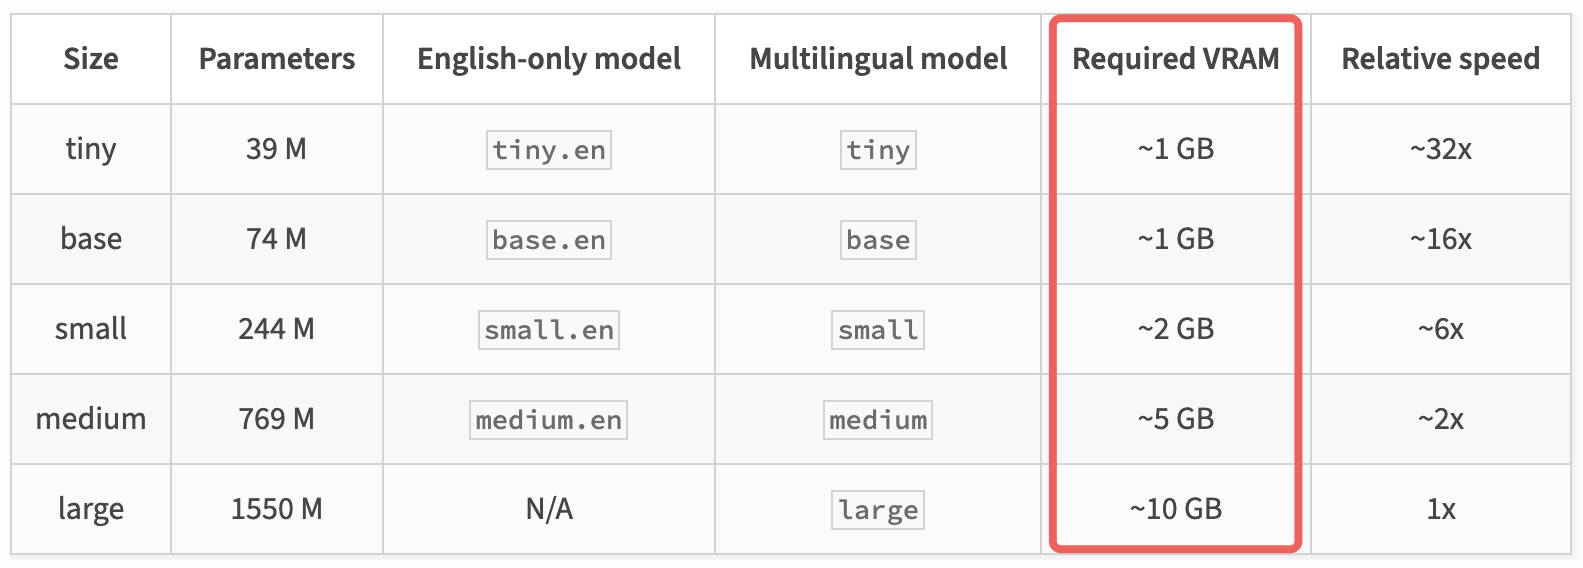
Update the
server/config.jsonfile to set your desired Whisper model. For example, to use themediummodel, set themodelproperty tomedium.{ "model": "medium" }Start the Whisper Transcriber Service. From the command line, run:
uvicorn main:app --port 5500 --host 0.0.0.0Once the Whisper Transcriber Service starts, you should see output similar to the following.
[2023-06-04 18:53:46.194411] Whisper API Key: 17ce01e9-ac65-49c8-9cc9-18d8deb78197
[2023-06-04 18:53:50.375244] Model: medium loaded.
[2023-06-04 18:53:50.375565] Ready to transcribe audio files.
The
Whisper API Keywill be also be displayed. Save theWhisper API Keysomewhere safe, you'll need the key to configure the Whisper client.Whisper API Key: <key>To stop the Whisper Transcriber Service, press
CTRL+Cin the terminal.To deactivate the Python virtual environment, run
deactivate.