Systems without an NVidia GPU
The Whisper Transcriber Service runs on Windows, macOS, and Linux systems without an NVidia GPU, it'll just run slower as the Whisper model run on the CPU.
From limited testing, the multilingual and the English-only OpenAI Whisper models for tiny(.en), small(.en), and medium(.en) models ran with acceptable performance on Windows 11 with a modern CPU and on a MacBook M2 Air with 16 GB of RAM.
Install system dependencies
Follow the instructions for your operating system.
Install Windows 11 dependencies
- Install
FFmpeg.- You can download the latest release from FFmpeg-Builds.
- Unzip the downloaded FFmpeg file and move to your preferred app folder.
- From
System Properties, selectEnvironment Variables, and add the path to the FFmpeg bin folder to the path. - Test FFmpeg. From a new terminal window, run
ffmpeg -version.
Install macOS dependencies
Install
FFmpegOpen a terminal window.
Install Homebrew.
Install FFmpeg. Run
brew install ffmpeg
Install Ubuntu 20.04 dependencies
- Install
FFmpegandpip3- Open a terminal window.
- Run:
sudo apt install ffmpeg python3-pip python3-venv
Start the Whisper Transcriber Service
From a terminal window.
Clone the Whisper Transcriber Sample to your preferred repo folder.
git clone https://github.com/gloveboxes/OpenAI-Whisper-Transcriber-Sample.gitNavigate to the
serverfolder.cd OpenAI-Whisper-Transcriber-Sample/serverCreate a Python virtual environment.
dangerAt the time of writing (June 2023), the Whisper Python library is supported on Python 3.8 to 3.10. The Whisper library worked on Python 3.11.3, but not Python 3.11.4. Be sure to check the version of Python you are using
python3 --version.python3 -m venv .whisper-venvActivate the Python virtual environment.
on Windows
.\.whisper-venv\Scripts\activateon macOS and Linux
source .whisper-venv/bin/activateInstall the required Python libraries.
pip3 install -r requirements.txtReview the following chart is taken from the OpenAI Whisper Project Description page and select the model that will fit in the RAM of your computer. At the time of writing, Whisper multilingual models include
tiny,small,medium, andlarge, and English-only models includetiny.en,small.en, andmedium.en.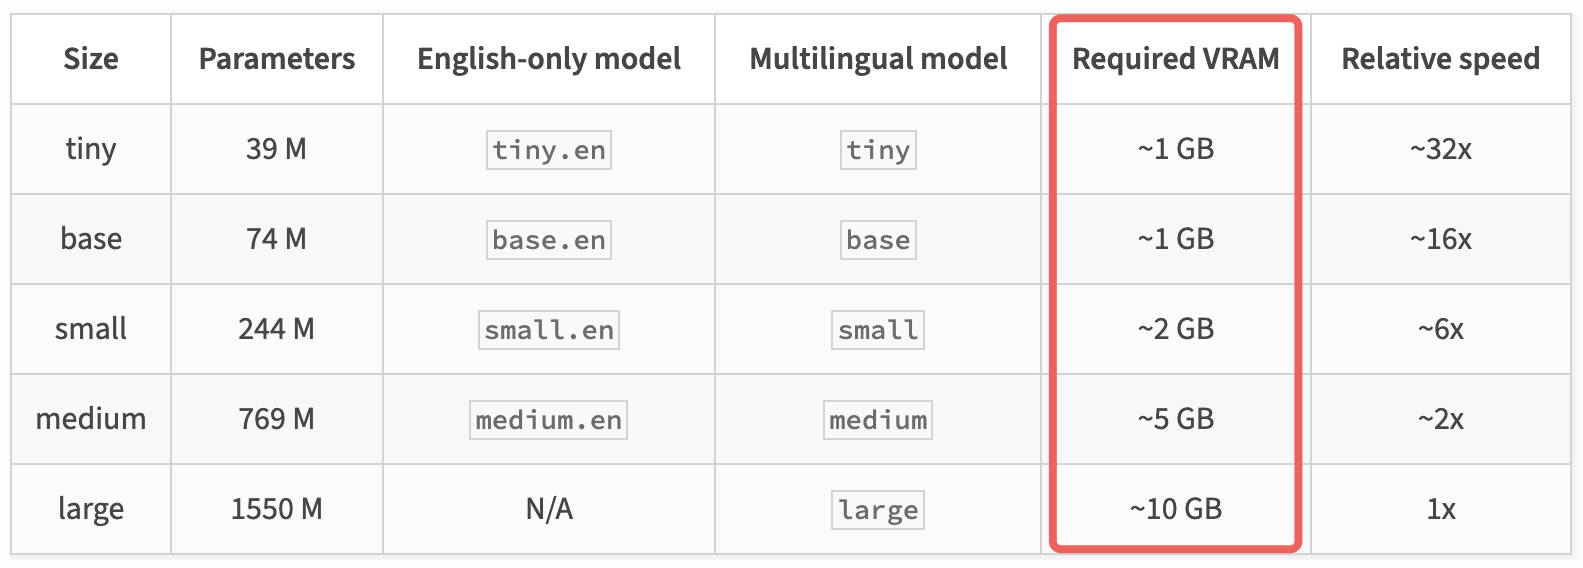
Update the
server/config.jsonfile to set your desired Whisper model. For example, to use themediummodel, set themodelproperty tomedium.{ "model": "medium" }Start the Whisper Transcriber Service. From the command line, run:
uvicorn main:app --port 5500 --host 0.0.0.0Once the Whisper Transcriber Service starts, you should see output similar to the following.
[2023-06-04 18:53:46.194411] Whisper API Key: 17ce01e9-ac65-49c8-9cc9-18d8deb78197
[2023-06-04 18:53:50.375244] Model: medium loaded.
[2023-06-04 18:53:50.375565] Ready to transcribe audio files.
The
Whisper API Keywill be also be displayed. Save theWhisper API Keysomewhere safe, you'll need the key to configure the Whisper client.Whisper API Key: <key>To stop the Whisper Transcriber Service, press
CTRL+Cin the terminal.To deactivate the Python virtual environment, run
deactivate.