PyLab 1: Raspberry Pi, Debugging a Python Internet of Things Application
Follow me on Twitter @dglover
| Author | Dave Glover, Microsoft Cloud Developer Advocate |
|---|---|
| Platforms | Linux, macOS, Windows, Raspbian Buster |
| Services | Azure IoT Central |
| Tools | Visual Studio Code |
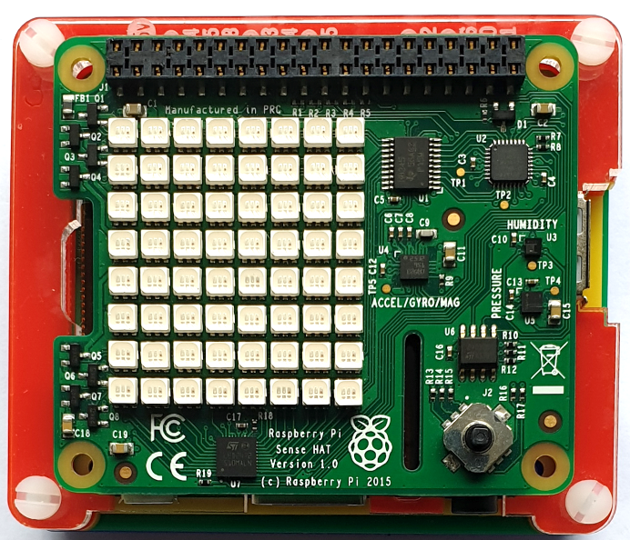
| Hardware | Raspberry Pi, Raspberry Pi Sense HAT |
| Language | Python |
| Date | September, 2019 |
PDF Lab Guide
You may find it easier to download and follow the PDF version of the Debugging Raspberry Pi Internet of Things Flask App PyLab.
PyLab Content
- PyLab 1: Raspberry Pi, Debugging a Python Internet of Things Application
- PyLab 2: Raspberry Pi, Azure IoT Central, and Docker Container Debugging
Introduction
In this hands-on lab, you will learn how to create and debug a Python web application on a Raspberry Pi with Visual Studio Code and the Remote SSH extension. The web app will read the temperature, humidity, and air pressure telemetry from a sensor connected to the Raspberry Pi.
PyLab Set Up
This automated set up installs the required libraies, Docker, and builds the lab docker images.
The Multi-user set up allows up to 20 users/students per Raspberry Pi 4 4GB. A USB3 SSD drive is required to support the disk IO requirements for this number of users. The installation script installs the lab content, and Docker. Builds the lab Docker Images, and sets up all the users.
Software Installation

This hands-on lab uses Visual Studio Code. Visual Studio Code is a code editor and is one of the most popular Open Source projects on GitHub. It runs on Linux, macOS, and Windows.
Install Visual Studio Code
- Install Visual Studio Code
Visual Studio Code Extensions
The features that Visual Studio Code includes out-of-the-box are just the start. VS Code extensions let you add languages, debuggers, and tools to your installation to support your development workflow.
Browse for extensions
You can search and install extensions from within Visual Studio Code. Open the Extensions view from the Visual Studio Code main menu, select View > Extensions or by clicking on the Extensions icon in the Activity Bar on the side of Visual Studio Code.
![]()
This will show you a list of the most popular VS Code extensions on the VS Code Marketplace.
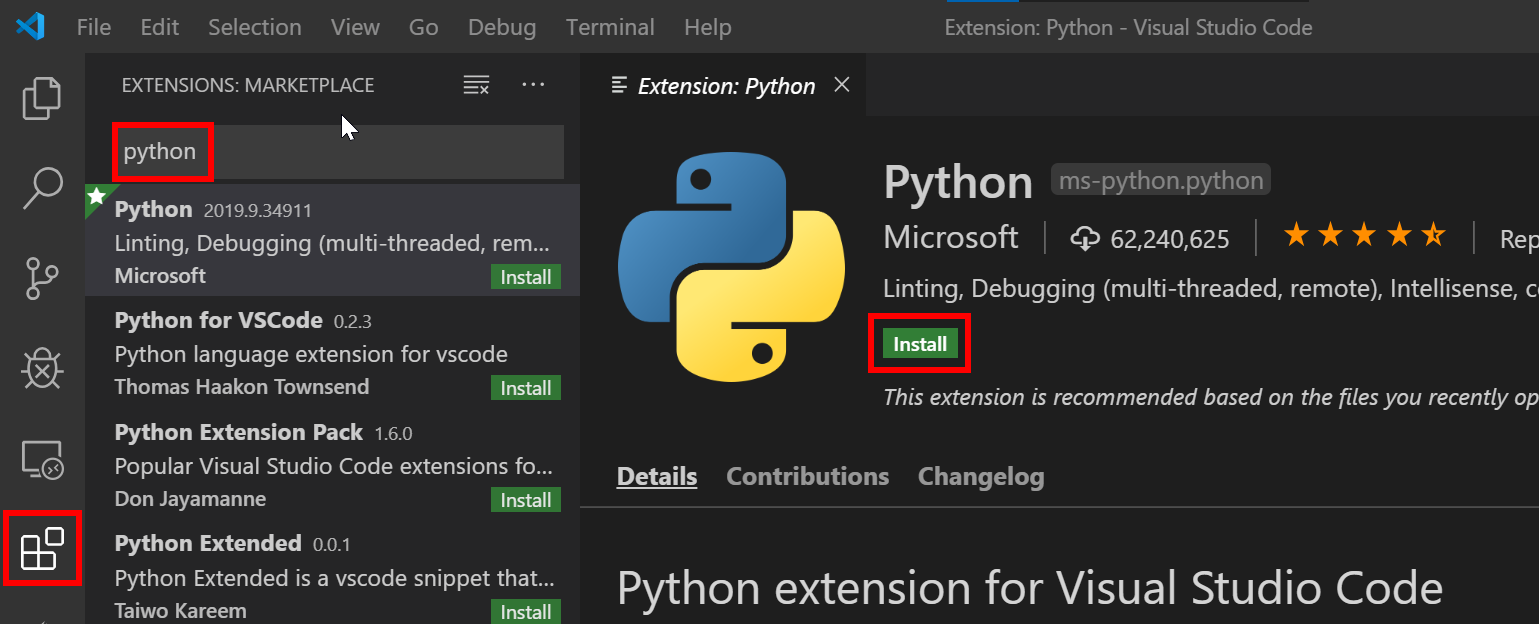
Install the Python and Remote SSH Extensions
Search and install the following two Visual Studio Code Extensions published by Microsoft.
Remote SSH Development
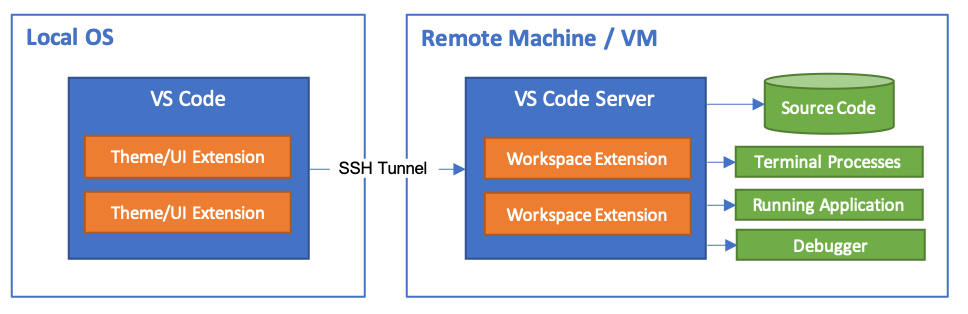
The Visual Studio Code Remote - SSH extension allows you to open a remote folder on any remote machine, virtual machine, or container with a running SSH server and take full advantage of Visual Studio Code.
Raspberry Pi Hardware
If you are attending a workshop, then you can use a shared network-connected Raspberry Pi. You can also use your own network-connected Raspberry Pi for this hands-on lab.
You will need the following information from the lab instructor.
- The Network IP Address of the Raspberry Pi
- Your assigned login name and password.
SSH Authentication with private/public keys

Setting up a public/private key pair for SSH authentication is a secure and fast way to authenticate from your computer to the Raspberry Pi. This is recommended for this hands-on lab.
SSH Set up for Windows Users
The SSH utility guides you through the process of setting up a secure SSH channel for Visual Studio Code and the Raspberry Pi.
You will be prompted for:
- The Raspberry Pi Network IP Address,
- The Raspberry Pi login name and password
-
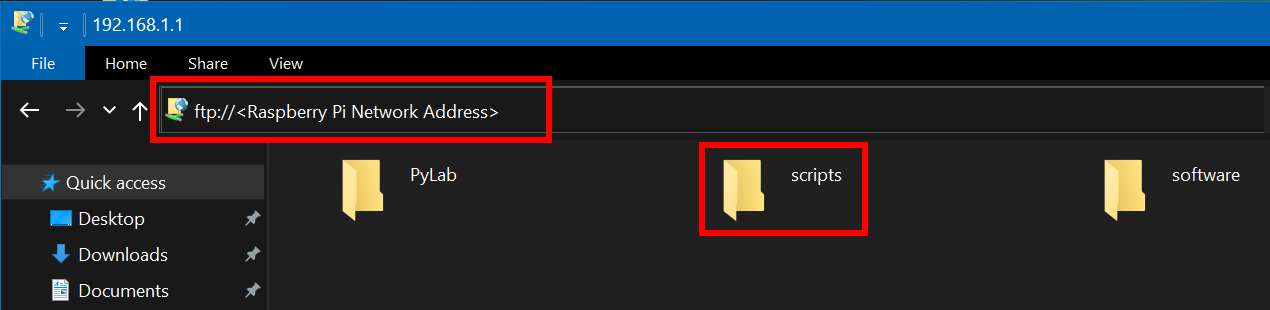
From Windows File Explorer, open ftp://<Raspberry Pi Address>

-
Copy the scripts directory to your desktop
- Open the scripts folder you copied to your desktop
- Double click the windows-setup-ssh.cmd
SSH Set up for Linux and macOS Users
The SSH utility guides you through the process of setting up a secure SSH channel for Visual Studio Code and the Raspberry Pi
You will be prompted for:
- The Raspberry Pi Network IP Address,
- The Raspberry Pi login name and password
- Open a Terminal window
-
Copy and paste the following command, and press ENTER
 read -p "Enter the Raspberry Pi Address: " pyurl && \
 curl ftp://$pyurl/scripts/ssh-setup.sh | bash
Start a Remote SSH Connection
- Start Visual Studio Code
-
Press F1 to open the Command Palette, type ssh connect and select Remote-SSH: Connect to Host
-
Select the pylab-devnn configuration

-
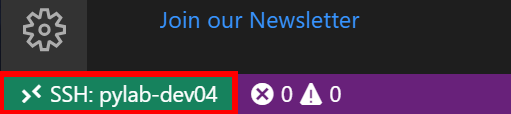
Check the Remote SSH has connected.
It will take a moment to connect, then the SSH Status in the bottom lefthand corner of Visual Studio Code will change to >< SSH:pylab-devnn. Where devnn is your Raspberry Pi Login name.
Open PyLab 1 Python Debug Project
Python Flask Web Apps
In this lab, we are going to start and debug a Flask app that reads a sensor attached to the Raspberry Pi. Flask is a popular Python Web Framework, powerful, but also easy for beginners.
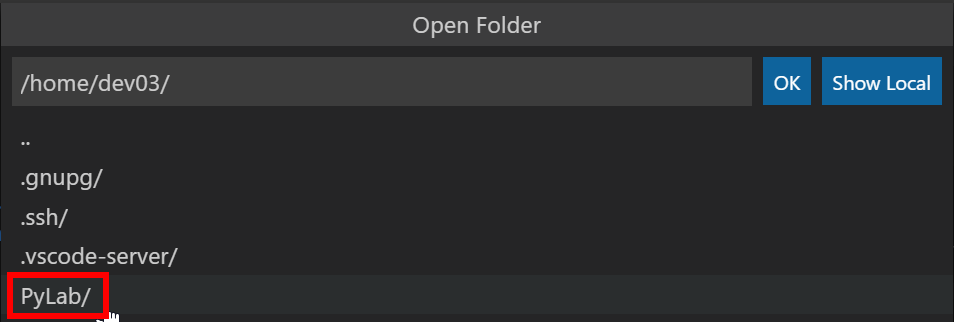
- From Visual Studio Code main menu: File > Open Folder
-
Select the PyLab directory
-
Next select, the PyLab-1-Python-Debug directory

- Click OK to Open the directory
-
From the Explorer bar, open the app.py file and review the contents

Take a moment to review the Python Flask web app.
app.py
from flask import Flask, abort, render_template
from datetime import datetime
import telemetry_client
# import sensor_bme280
import time

# myTelemetry = sensor_bme280.Telemetry()
myTelemetry = telemetry_client.Telemetry()
app = Flask(__name__)


@app.route('/')
def show_telemetry():

    now = datetime.now()
    formatted_now = now.strftime("%A, %d %B, %Y at %X")

    title = "Raspberry Pi Environment Data"

    temperature, pressure, humidity, timestamp, cpu_temperature = myTelemetry.measure()

    sensor_updated = time.strftime(
        "%A, %d %B, %Y at %X", time.localtime(timestamp))

    if -40 <= temperature <= 60 and 0 <= pressure <= 1500 and 0 <= humidity <= 100:
        return render_template('index.html', title=title,
                            temperature=temperature, pressure=pressure,
                            humidity=humidity, cputemperature=cpu_temperature)
    else:
        return abort(500)
Start the Python Flask App
-
Press F5 to start the Python Flask app.
-
This will launch your desktop Web Browser.
- The Flask app will read the temperature, air pressure, humidity from the sensor attached the Raspberry Pi and display the results in your web browser.
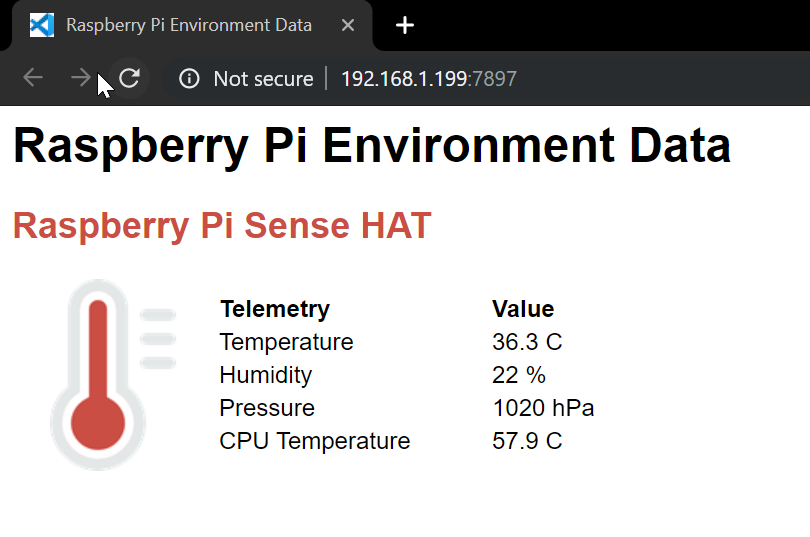
- The Flask app will read the temperature, air pressure, humidity from the sensor attached the Raspberry Pi and display the results in your web browser.
Debugging with Breakpoints
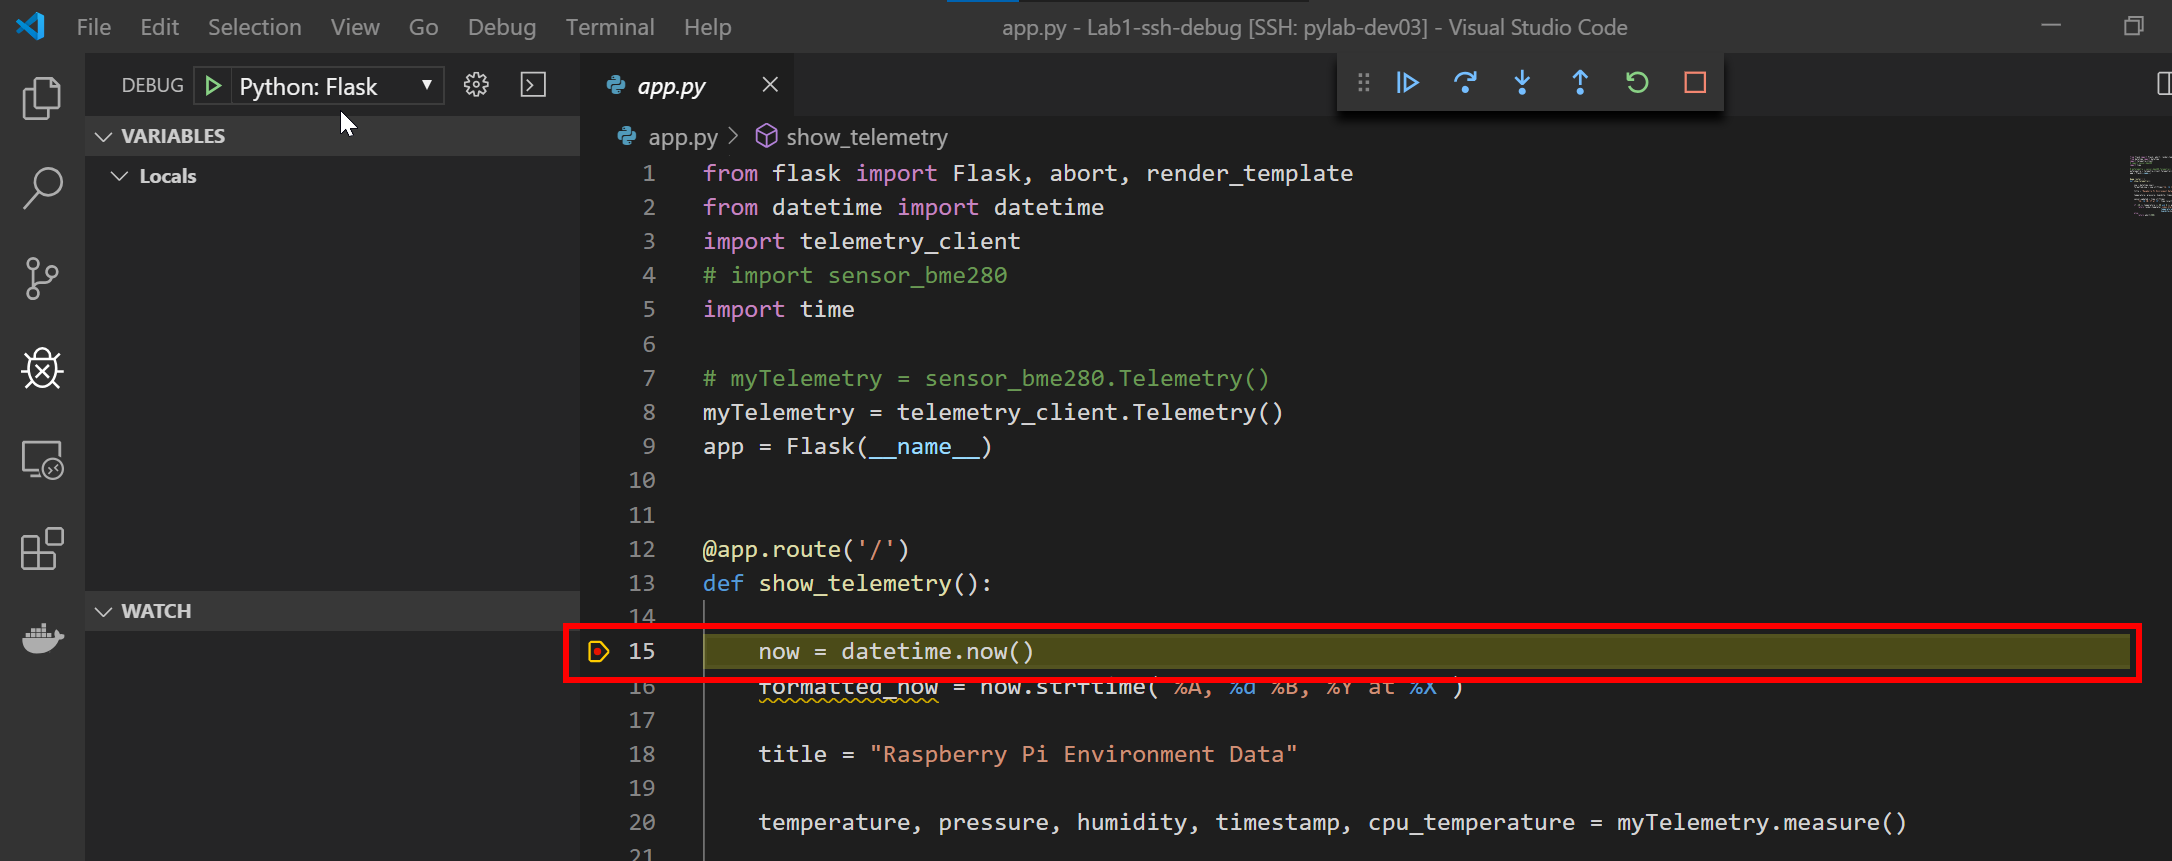
- Switch back to Visual Studio Code and ensure the app.py file is open.
- Put the cursor on the line that reads now = datetime.now()
-
Press F9 to set a breakpoint. A red dot will appear on the line to indicate a breakpoint has been set.

- Switch back to the Web Browser and click Refresh. The web page will not respond as the debugger has stopped at the breakpoint you set.
-
Switch back to Visual Studio Code. You will see that the code has stopped running at the breakpoint.
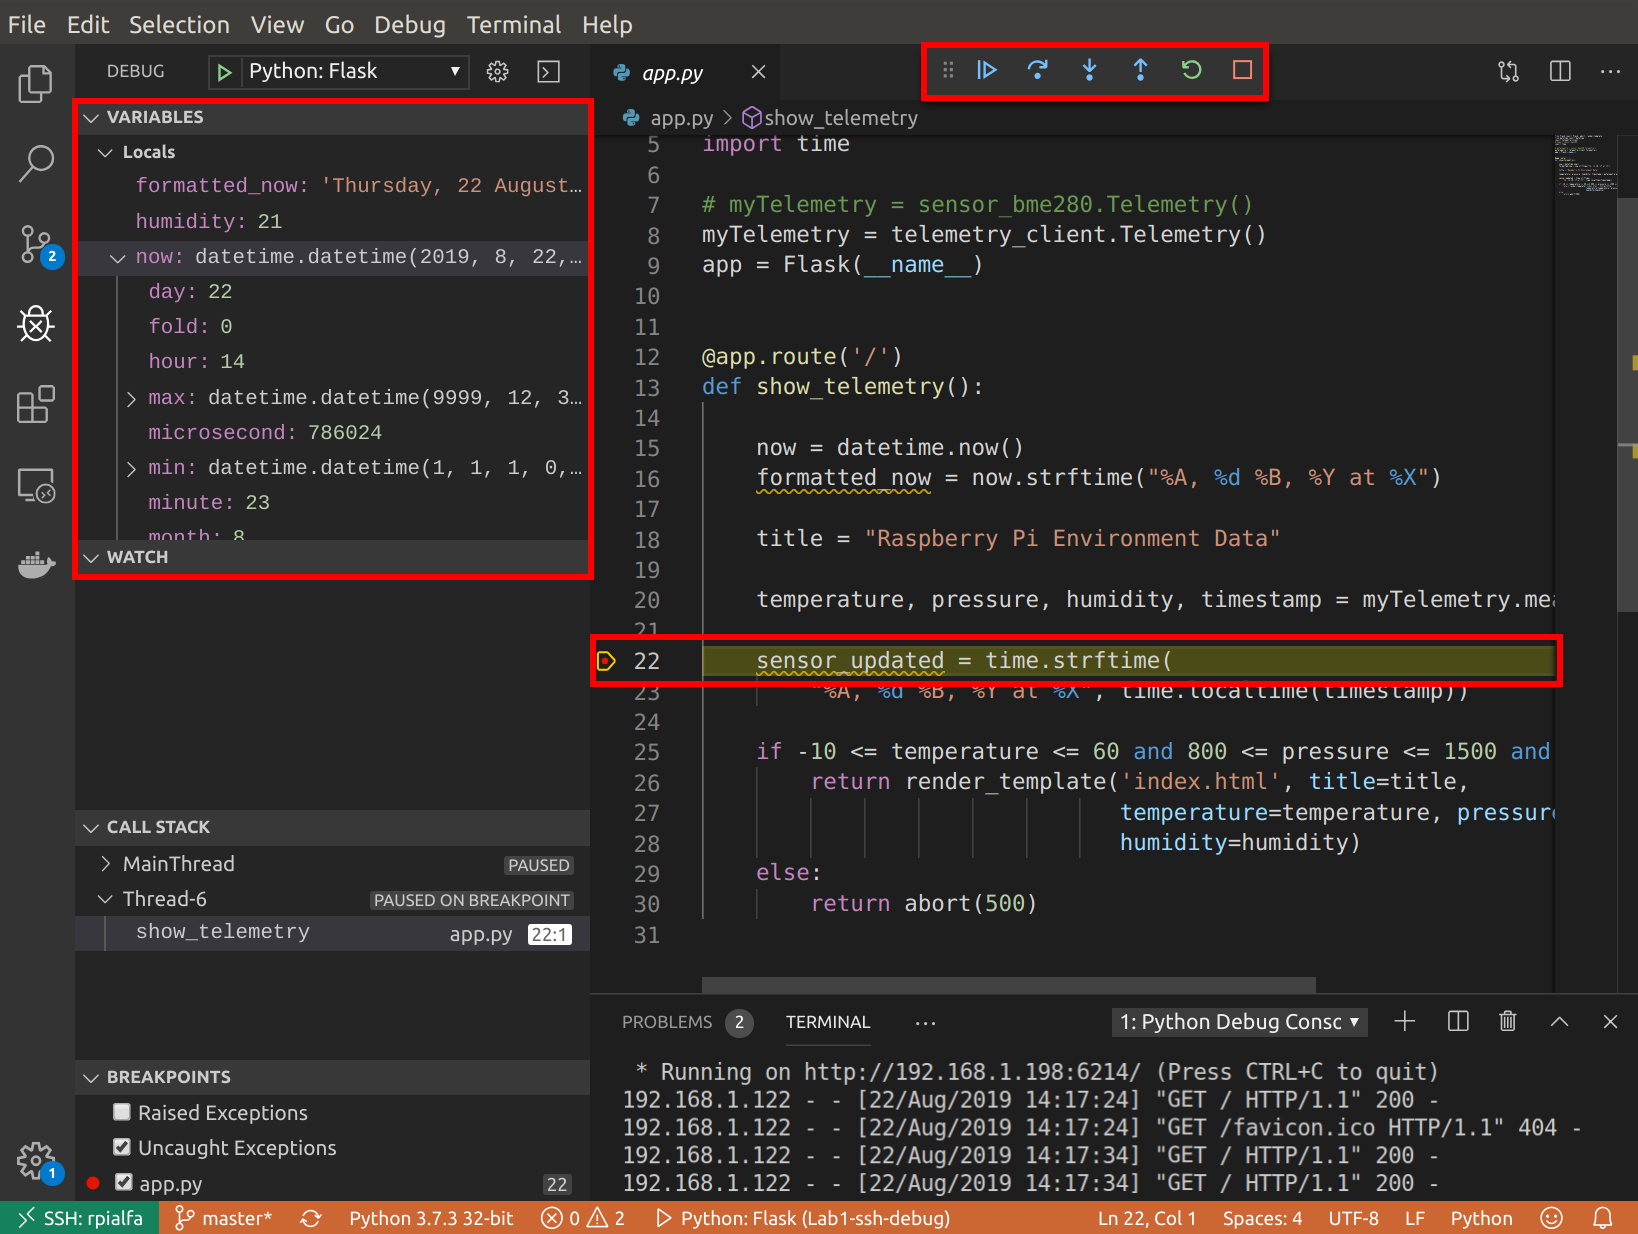
Debugger Toolbar Options
When a debug session starts, the Debug toolbar will appear at the top of the editor window.
The debugging toolbar (shown below) will appear in Visual Studio Code. It has the following options:

- Pause (or Continue, F5),
- Step Over (F10)
- Step Into (F11),
- Step Out (Shift+F11),
- Restart (Ctrl+Shift+F5),
- and Stop (Shift+F5).
Start Debugging
- Step through the code by pressing (F10) or clicking Step Over on the debugging toolbar.
- Repeat pressing F10 until you reach the line that reads if -40 <= temperature <= 60 and 0 <= pressure <= 1500 and 0 <= humidity <= 100:
-
You will notice that Python variables are displayed in the Variables Window.
If the Variable Window is not visible click Debug in the activity bar.

- Try to change the temperature variable to 50. Hint, right mouse click on the temperature variable and select Set Value, or double click on a temperature variable.
- Press F5 to resume the Flask App, then switch back to your web browser and you will see the temperature, humidity, and pressure Sensor data displayed on the web page.
Debugging with Conditional Breakpoints
Try setting a conditional breakpoint
- Clear the existing breakpoints. From the main menu select Debug > Remove all breakpoints.
- Ensure the app.py file open.
-
Right mouse click directly in the margin to the left of the line number 22.
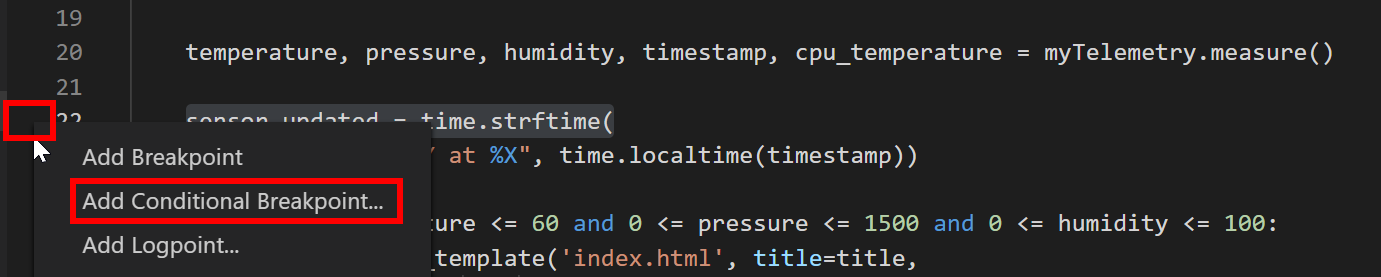
- Select Add Conditional Breakpoint…
-
Set the condition to temperature > 25, then press ENTER
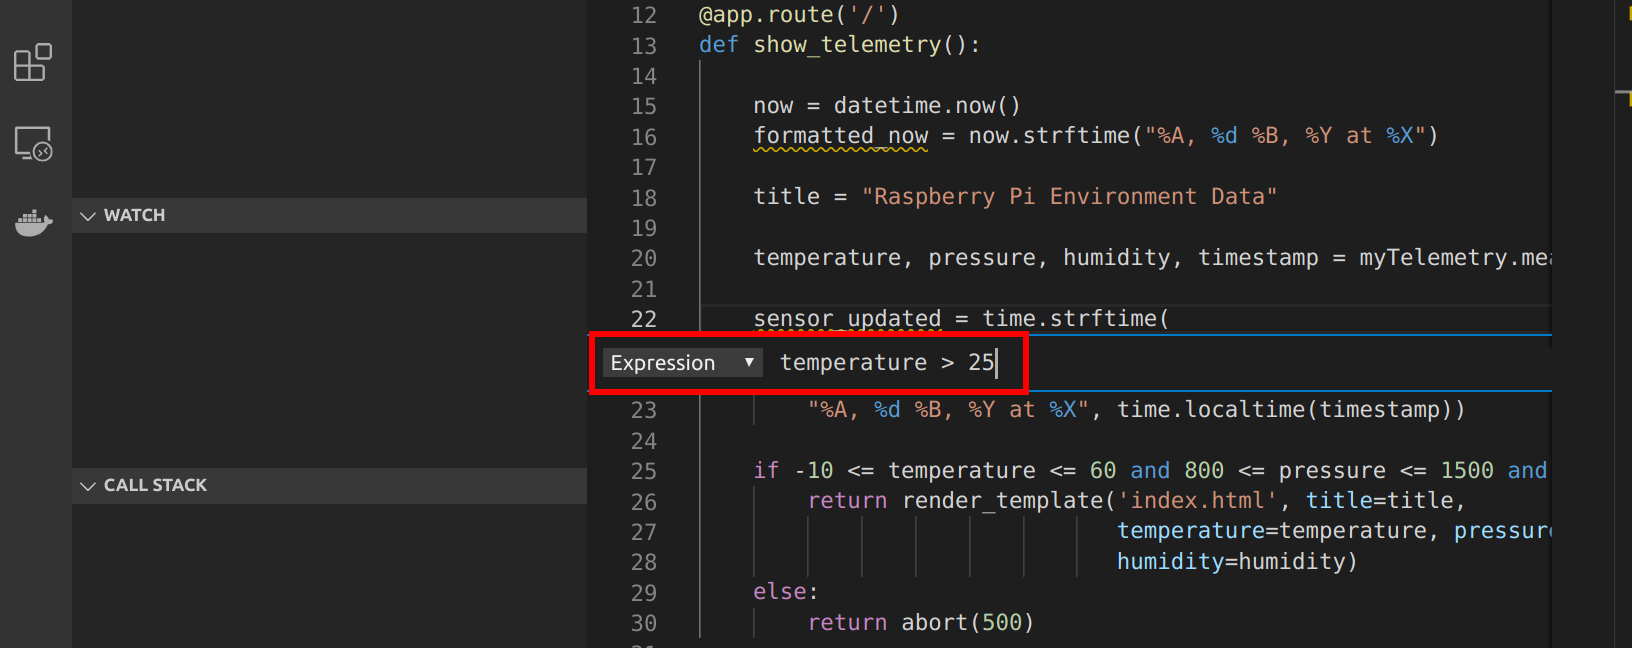
The breakpoint appears as a red dot with an equals sign in the middle
- Switch back to the Web Browser and click Refresh. The web page will not respond as the debugger has stopped at the breakpoint you set.
- Switch back to Visual Studio Code and you will see the debugger has stopped at the conditional breakpoint.
- Press F5 to continue running the code
- Switch back to your web browser to view the page.
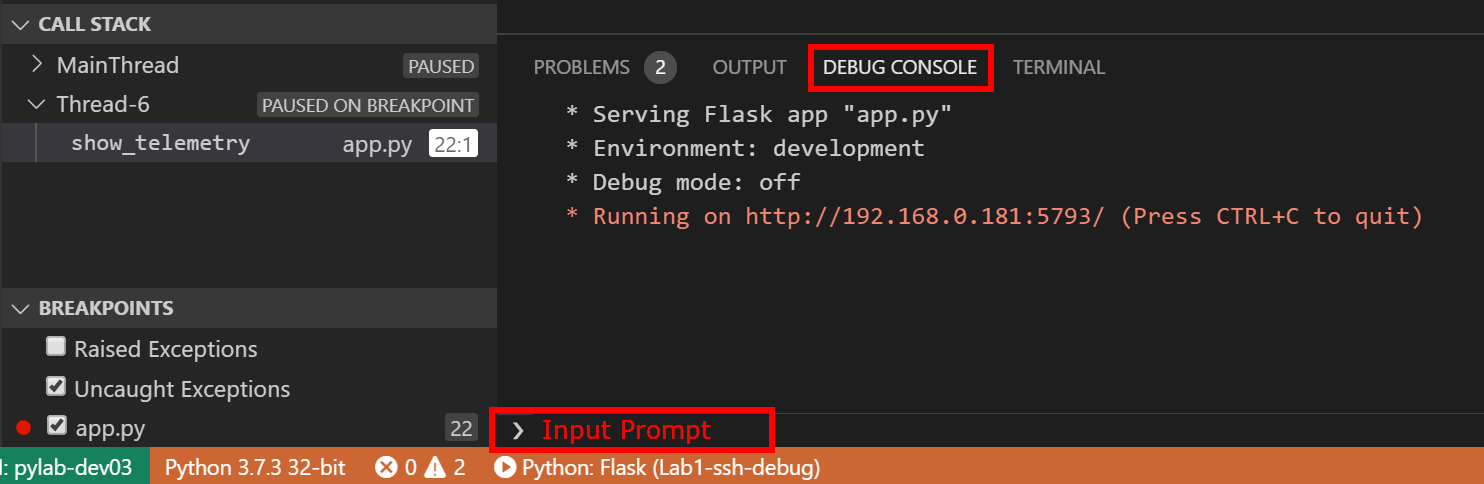
Interactive Debug Console
The Visual Studio Code Debug Console will give you access to the Python REPL (Read, Evaluate, Print Loop).
- Switch back to your web browser and click refresh. The web page will not respond as the Python code has been stopped by the debugger.
- Switch back to Visual Studio Code
- The code will have stopped at the conditional breakpoint you previously set.
-
Select the Visual Studio Debug Console window.
-
Type the following Python code into the Input Prompt >
print(temperature) - Press Enter to execute the Python code you typed.
-
Try running the following Python code snippets from the input prompt.
temperature = 24 import random random.randrange(100, 1000) - Press F5 to continue the execution of the Python code.
- Switch back to you web browser to see the updated page.
Lab Challenges
Lab Challenge 1: Update the Flask Template
- Update the Flask index.html template found in the templates folder to display the current date and time.
- Rerun the Flask app.
Lab Challenge 2: Experiment with Debugger Options
Things to try:
- Review the Visual Studio Code Python Tutorial
- Review the Python Flask tutorial
- Review the Visual Studio Code Debugging Tutorial
Review the Debug Launch Settings
-
Switch to Debug view in Visual Studio Code (using the left-side activity bar).
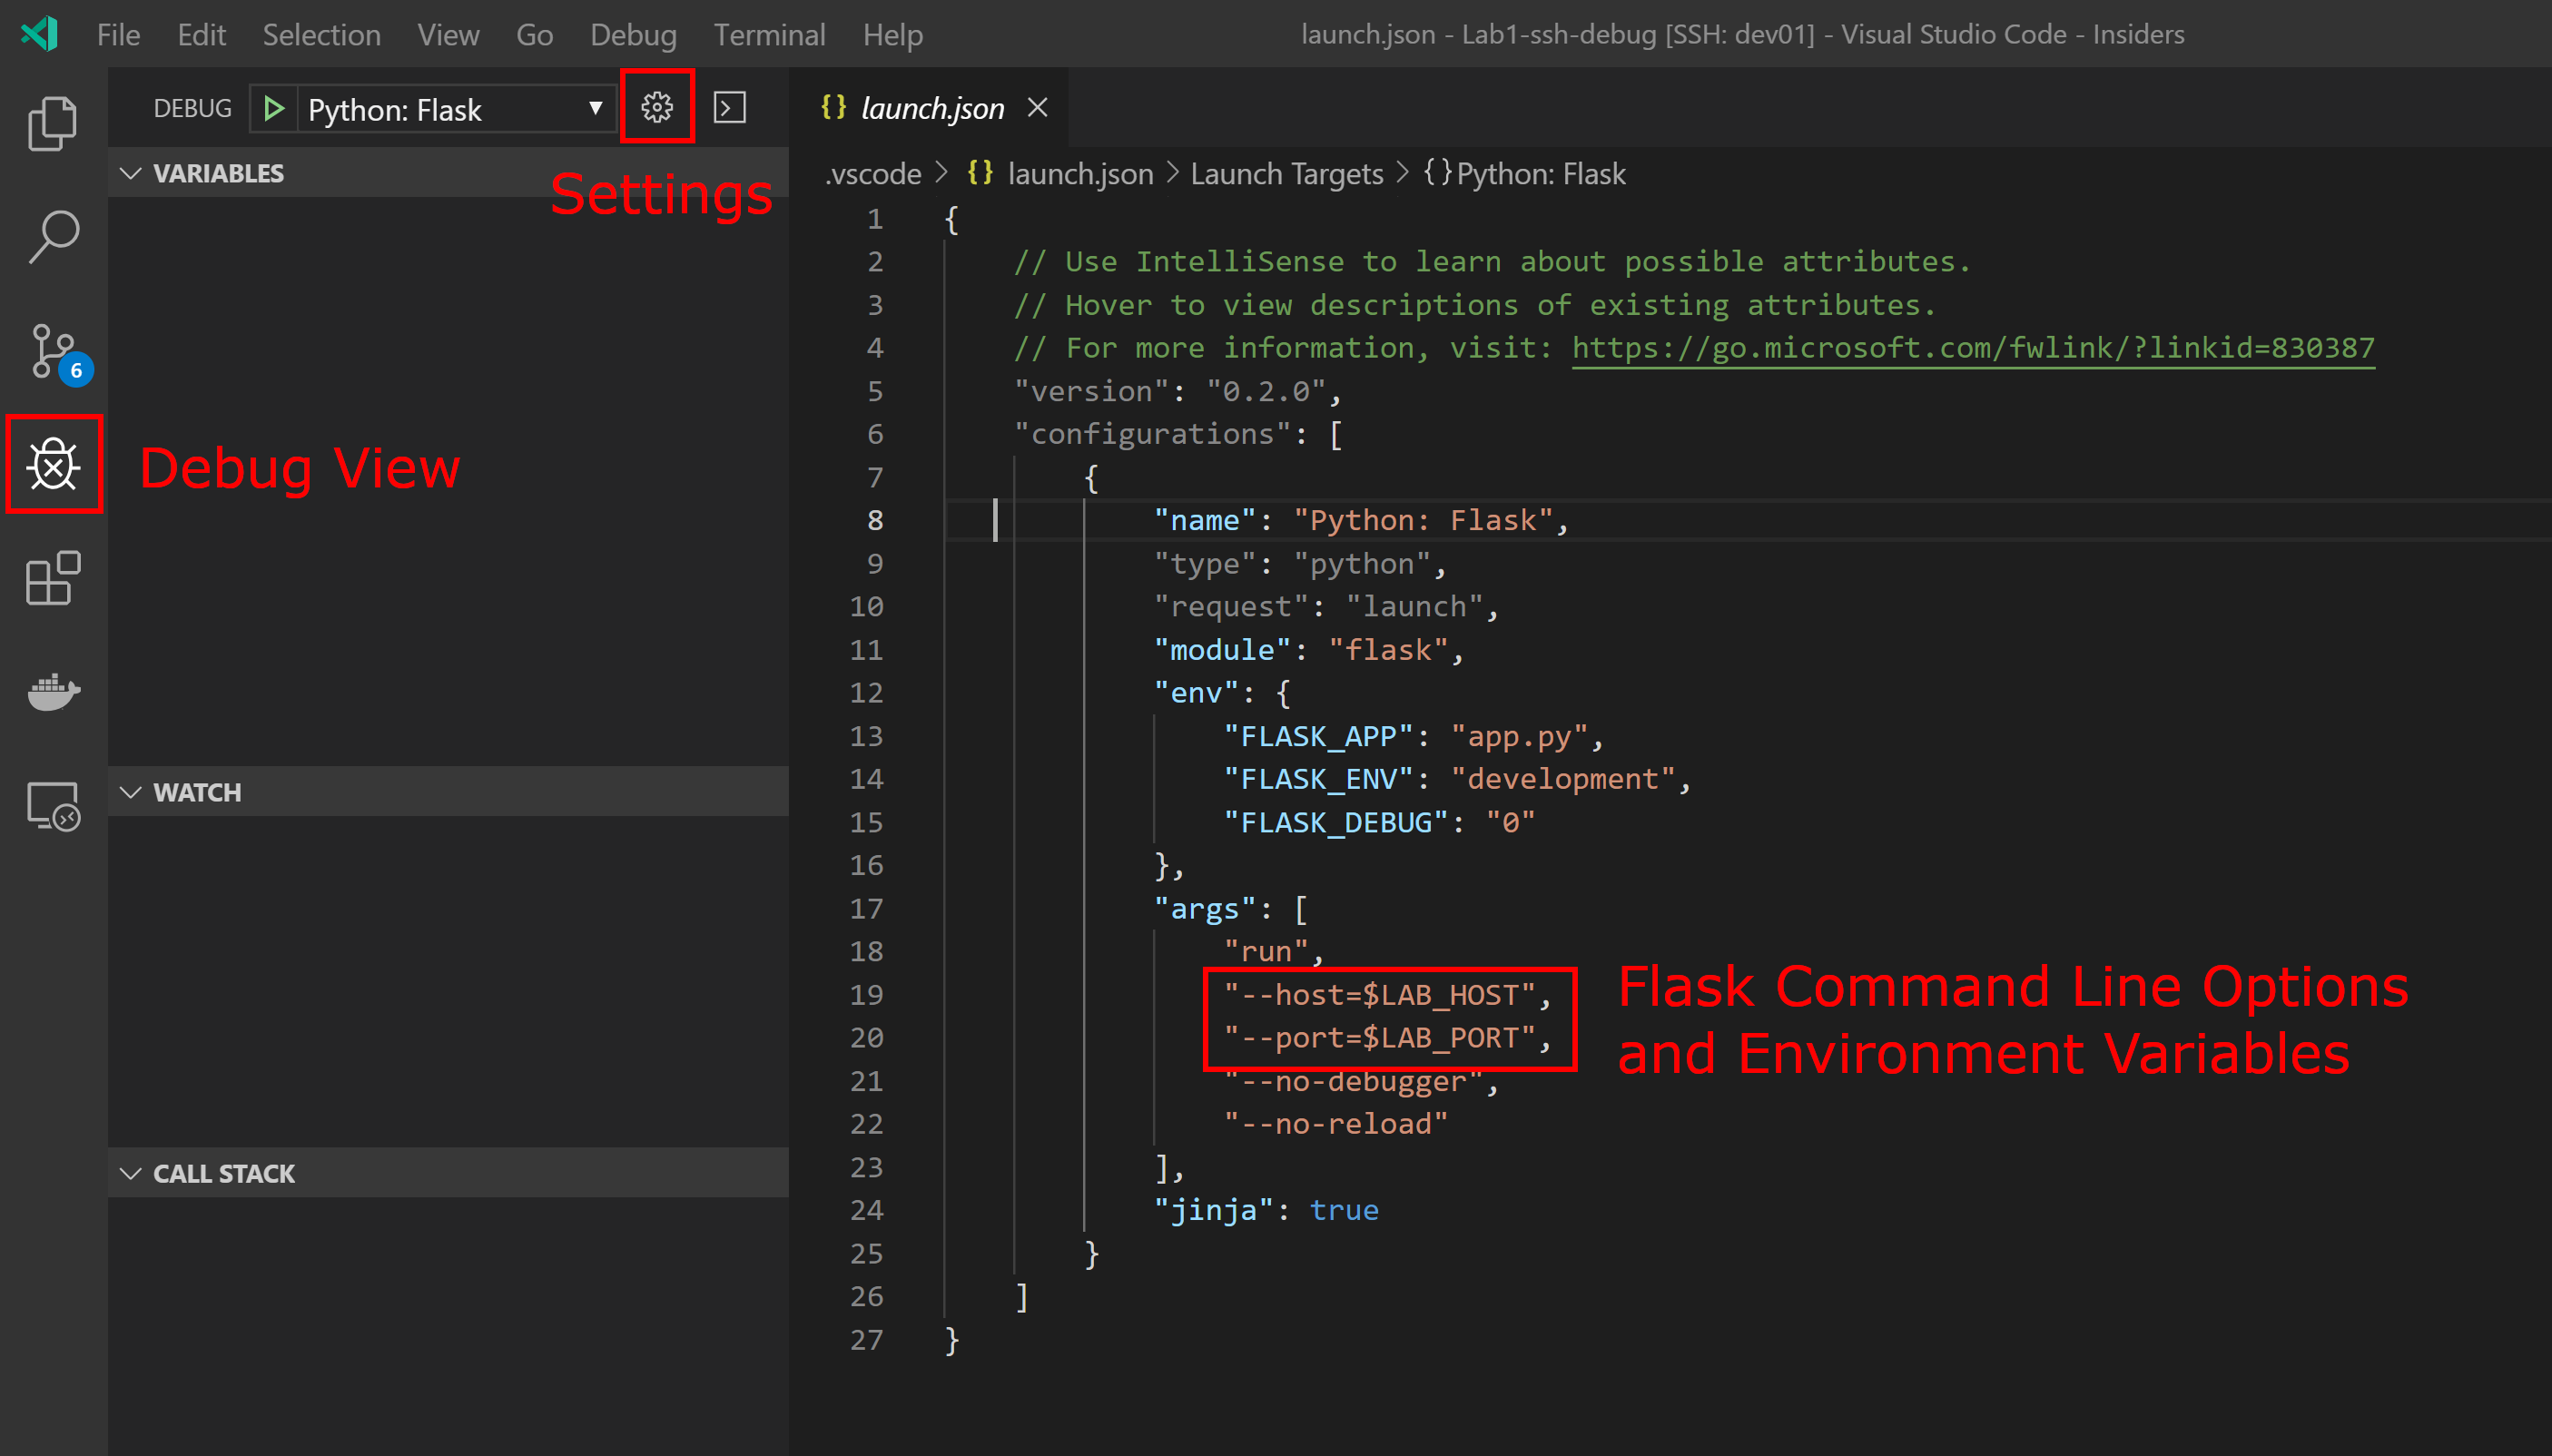
- Click the Settings button which will open the launch.json file.
-
The launch.json file defines how the Flask app will start, and what Flask Command Line parameters to pass at startup.
There are two environment variables used in the launch.json file. These are LAB_HOST (which is the IP Address of the Raspberry Pi), and LAB_PORT (a random TCP/IP Port number between 5000 and 8000). These environment variables are set by the .bashrc script which runs when you connect to the Raspberry Pi with Visual Studio Remote SSH.
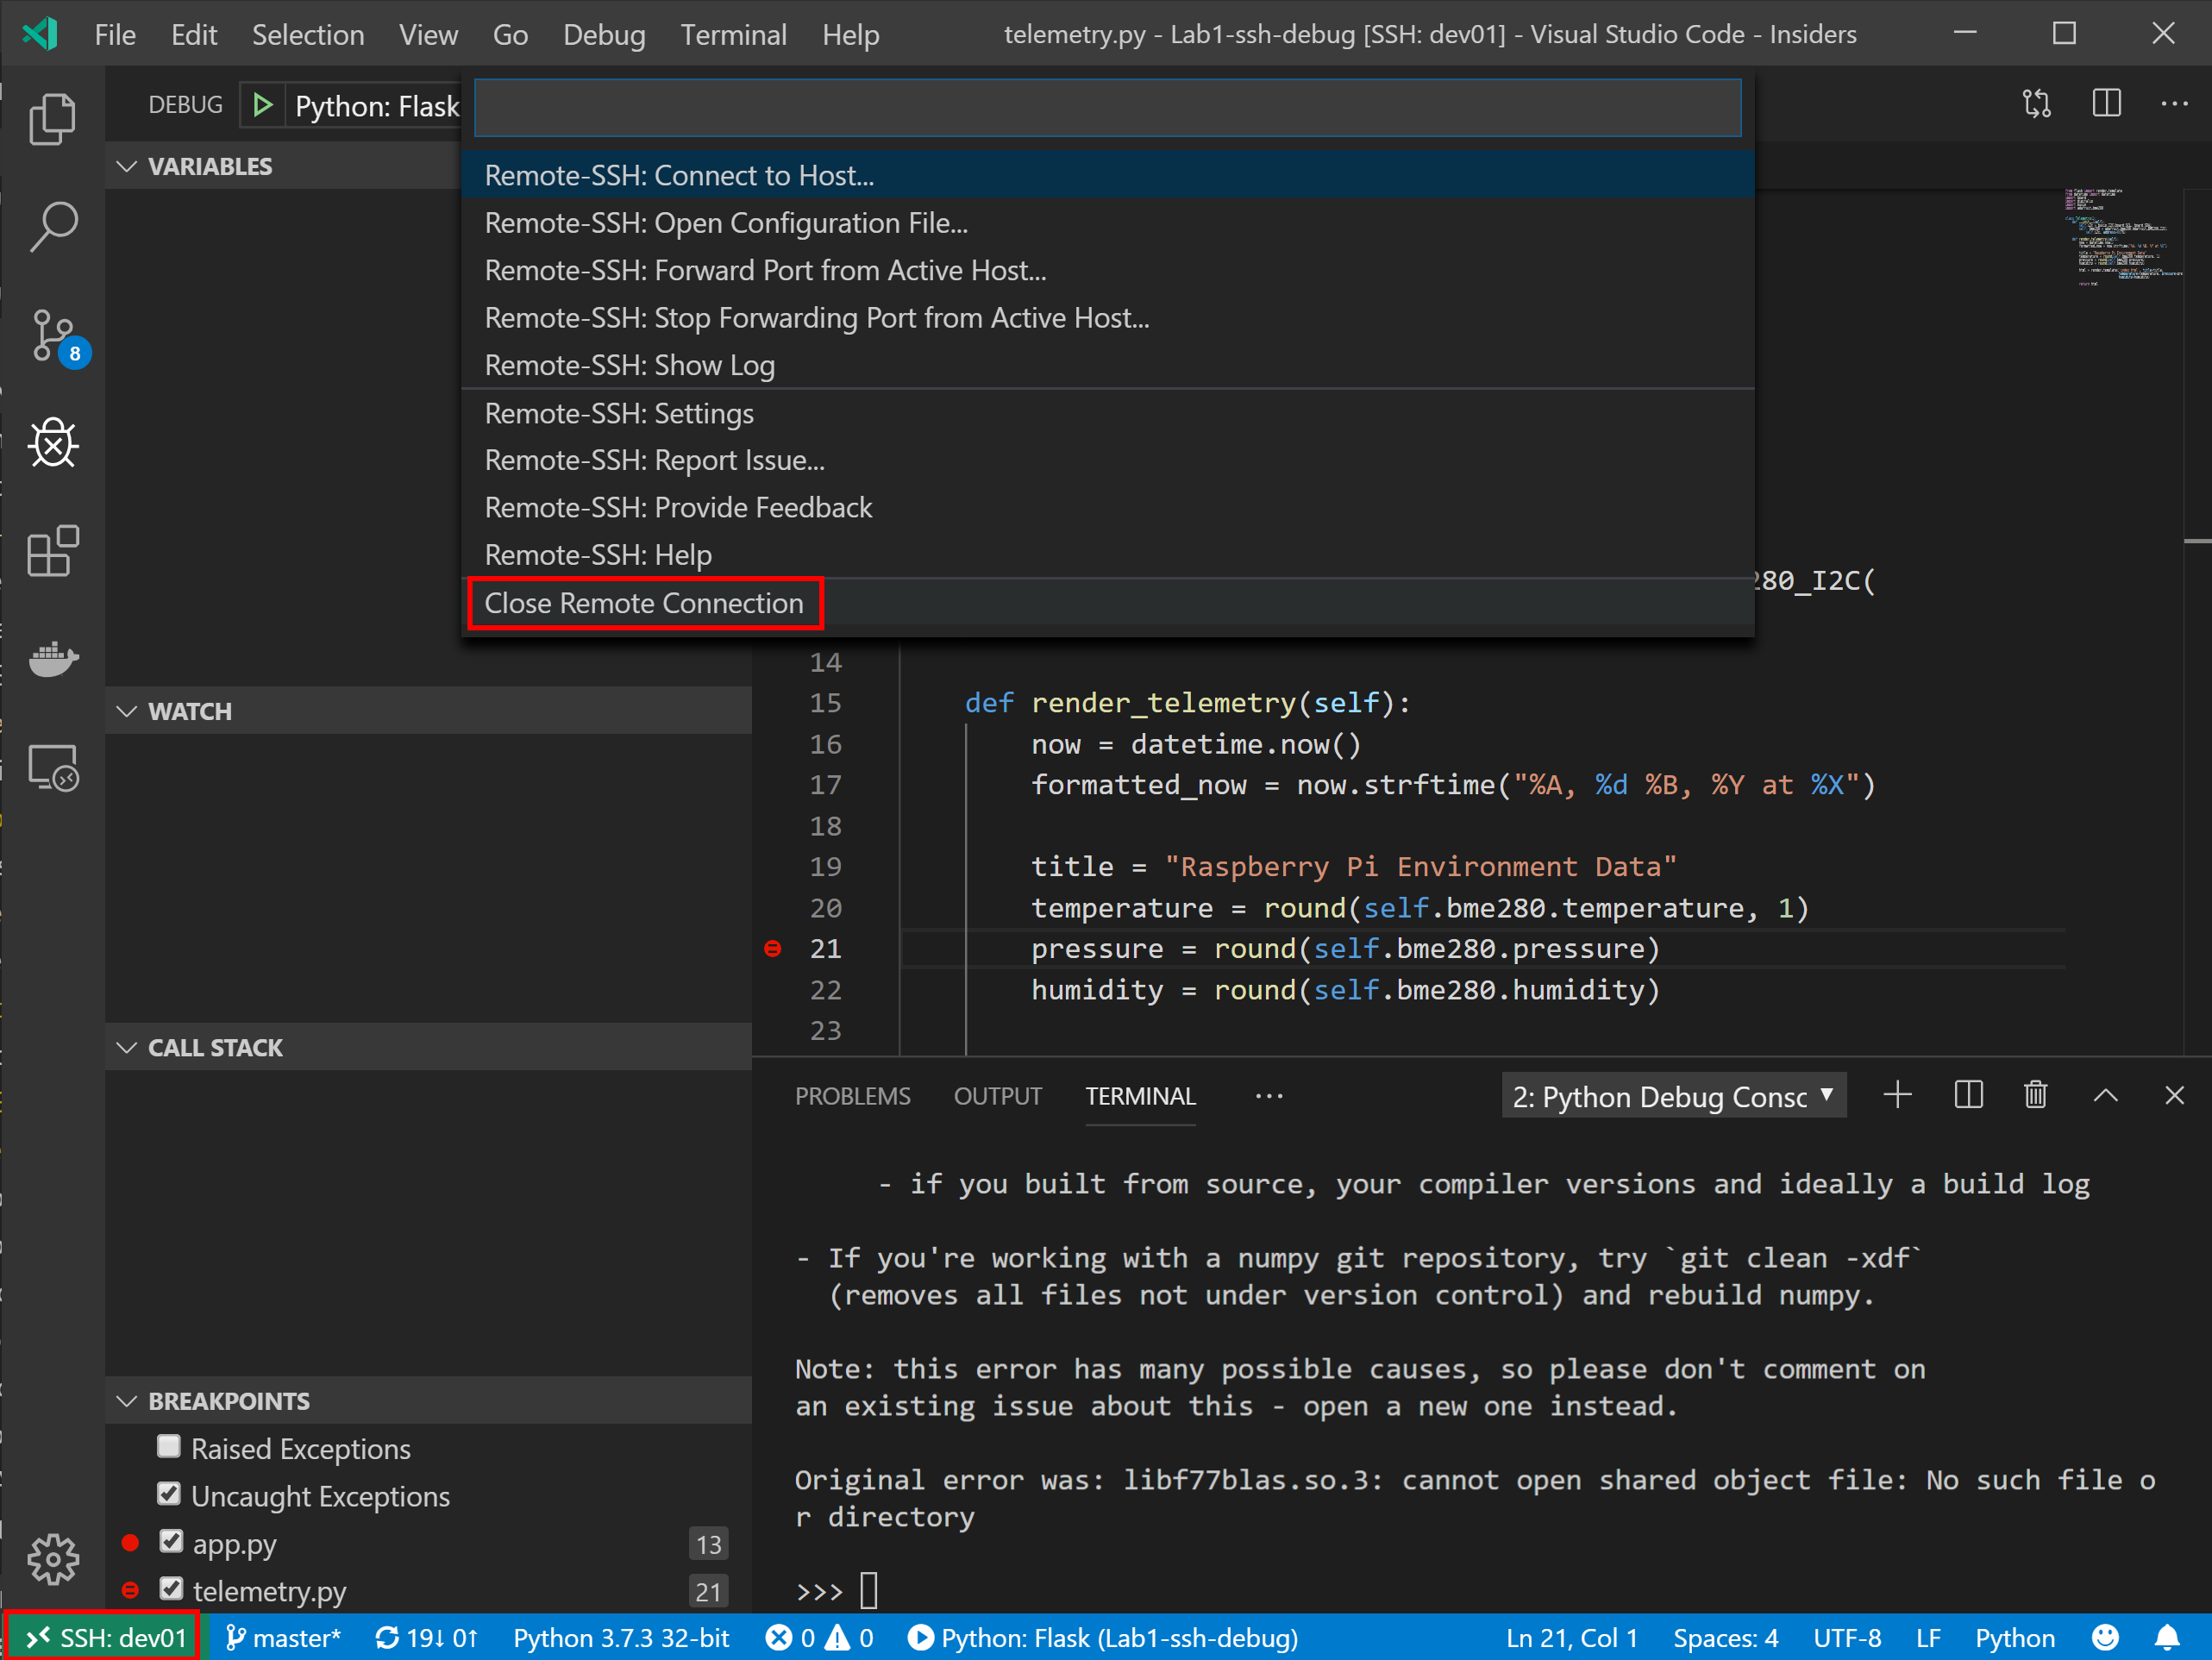
Closing the Remote SSH Session
From Visual Studio Code, Close Remote Connection.
-
Click the Remote SSH button in the bottom left-hand corner and select Close Remote Connection from the dropdown list.
Finished